Multitrack Sound File Viewing & Editing Software
Overview
Adobe Audition is an auxiliary (shareware) program that is useful with many GL Products and software. It allows listening, viewing, and analysis of single or dual timeslot recorded files from T1 and E1 lines. It also permits sophisticated editing of voice files. Adobe Audition can also be used to view real time signals with GL's PCI T1 and E1 cards View Real time Signals.
Other features of the program include:
- viewing of A-law and u-law encoded voice and many other encodings
- viewing of two files side by side for comparison purposes
- zoom-in and zoom-out features
- accurate measurement of timing information
- spectral displays
- real-time viewing of signals
This utility program is useful (and should be ordered) with the following software packages.
- Record and Playback File Software (XX020)
- Transmit/Receive File Utility Software (XX019)
- Scripted Control Software (XX600)
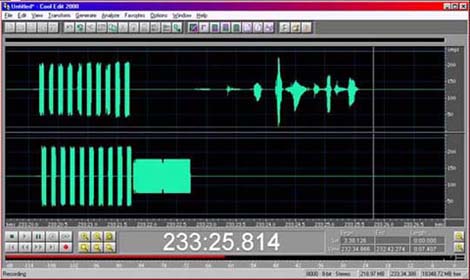
A sample screen is provided below:

Procedure to view a captured file for 'mono' mode (single) file using adobe audition:
GL T1 or E1 Cards can be used capture real time data with an application called 'Record data into file'. Other applications that can record data are 'Multiple Card Capture' and Tx/Rx File Utility.
To view a captured file open Adobe Audition software either by clicking on the Adobe Audition Icon or by selecting the 'View PCM' from the 'Call Capture and Analysis' selection of the T1/E1 GUI.
Procedure to view a captured file for 'stereo' mode ('two' files simultaneously) using adobe audition:
Invoke 'View PCM' from 'Call Capture and Analysis' in the special applications of the T1/E1 card. The user can select any 2 files by holding down the control key and selecting the two files with the mouse. Adobe audition will be automatically invoked and two files will be displayed side by side.
T1/E1 Real Time Strip Chart Views with GL Comm Test Analyzer Cards
Adobe Audition can be used to view, record, and listen to audio signals on T1 or E1 lines in real-time as the signals occur. This would be ideal for viewing DTMF / MF / MFC-R2 signaling, or viewing the input and output of a real-time signal processing system. Other applications include:
- View CAS (Channel Associated Signaling) in real time, such DTMF / MF /MFC-R2 digits
- Echo Canceler Test Applications - verify reduced or cancelled echo in real time
- Voice Quality Test Applications - view and record 'the input to' and 'the output from' various telecom networks
- Monitor and record bi-directional voice calls
- Use other T1/E1 applications simultaneously
The T1/E1 Real Time Strip Chart Kit (part number RTC150) provides a scrolling real-time display of the decoded audio waveform from one or more timeslots of a T1 or E1 trunk. This option uses an existing GL Communications T1 or E1 Analysis product (Single or Dual PCI T1 or E1 Cards or Single or Dual T1 or E1 Laptops) along with a conventional sound card, Adobe Audition™ sound analysis program, and special connecting cables. Adobe Audition™ software and cables are provided with this option. GL Analysis Card(s) and sound card must be purchased separately if you do not already have these items. If you already own the necessary GL Analysis cards and have Adobe Audition™ software, you may setup this operation by simply adding the necessary cables.
Real Time Strip Chart: Theory of Operation
Once a GL Analysis card or Laptop is connected to a valid T1 or E1 digital trunk signal, the existing audio codec on the GL card is always feeding decoded (u-law or A-law) audio (from the currently selected timeslot) to the card's VF OUT jack. This output is in turn connected by supplied cables to the LINE input of the sound card. One codec (VF OUT) port is required for each channel (timeslot) that you wish to view. (Example: Viewing 2 timeslots will require a DUAL T1 or E1 Analysis Card or 2 Single T1 or E1 Analysis Cards.) Adobe Audition™ is then placed in Record mode. ('Live update during Record' must be enabled in Adobe Audition™ first). A smoothly scrolling view of the decoded audio is now displayed, with several levels of zoom available. You can actually select a portion of the already recorded audio, which temporarily stops scrolling, and zoom in for closer inspection, without stopping the record process. Scrolling can then be resumed if desired. The Adobe Audition™ display window is of course resizable.
If viewing of more than 2 channels simultaneously is desired, a multi-channel sound card and Adobe Audition™ PRO Software is also available from GL Communications in the 4-channel RTC160 package. (Requires sufficient GL Analysis products - one Analysis port/VF OUT for each audio channel to be displayed.)
Real Time Strip Chart: Setup and Operation
- If you have not already done so, install the main program for the GL Communications T1 or E1 Analysis product that you
are using (Laptop or PCI card). See the GL Communications T1/E1 User's Manual for detailed instructions. Also install the
Adobe Audition™ or Adobe Audition™ PRO software.
IMPORTANT: Click on Options - Settings within Adobe Audition. Check the box for Live update during Record. If this is not checked, the Real Time Strip Chart operation will not work.
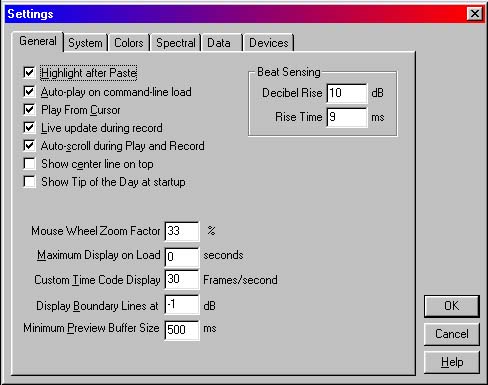
Under the Settings - System tab you may also want to check the Temporary directory that Adobe Audition will be using. Make sure that the directory chosen has sufficient space in case of an extra long session of Real Time Strip Chart viewing, since you are recording the audio to a file during the process. Close Adobe Audition. - Connect the T1 or E1 digital trunk(s) that you want to monitor to the digital (Data) ports on the GL Communications Analysis cards or Laptop unit. Start the main program for the Analysis cards. Set the receiver interface selector for each card (Data port) to the correct mode for your application (Bridge, Monitor, or Terminate). See the GL Communications T1/E1 User's Manual for detailed instructions. Check the Monitor boxes to verify that the cards have proper sync with the digital trunk(s).
- In the VF (Voice Frequency) control box along the right side of the display, set the VF Out timeslot selector to the desired timeslot on each card (Data port) you are using. (Use the card selector near the top to change to a different card.)
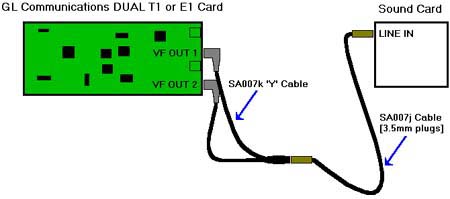
- Connect a 3.5mm Stereo Plug cable to the LINE input of the sound card. Connect the other end (also a 3.5mm plug) to the 3.5mm jack of the 'Y' cable. Connect one of the two 3.5mm plugs on the 'Y' cable to the VF OUT jack on one of the GL Communications Analysis boards. It is not really important which one you choose. Connect the second 3.5mm plug of the 'Y' cable similarly to the second VF OUT jack on the remaining Analysis board. (On the same physical board if you are using a Dual Analysis board.) Note about channel identification: The 3.5mm plugs of the 'Y' cable have color-coded insulation rings on the metal plug stem itself. The VF Output that has the White-insulator ring plug connected to it will usually appear as the LEFT or Upper channel in the Adobe Audition scrolling waveform display. This may vary with different sound cards.
- Open the Windows Volume Control Panel. Click on Options\Properties. Click the Recording option and then make sure that the LINE Input is enabled in the lower box. Click OK. Leave this box, which now leaves the Recording Control panel open.
- Open the Adobe Audition program. Select File\New. Select 8000 Hz sample Rate, Stereo mode, 8-bit bytes. (This will minimize the disk space used during the operation.) Click on the red Record button. Adjust the Line level, and if equipped, Master record level in the Windows Recording Control box for proper levels as shown in the scrolling waveform display. (Sufficient amplitude but without clipping.)
- Use the mouse to manually select a portion of the waveform for closer inspection. (Scrolling will temporarily stop.) Use the yellow Adobe Audition zoom control buttons to zoom in or out. To resume scrolling, zoom out and then click on the small green bar in the position indicator bar just above the waveform display. Drag it all the way to the right end. Stop the Recording when you are finished.
Resources
Note: PCs which include GL hardware/software require Intel or AMD processors for compliance.
Please Note1: The XX in the Item No. refers to the hardware platform, listed at the bottom of the Buyer's Guide, which the software will be running on. Therefore, XX can either be ETA or EEA (Octal/Quad Boards), PTA or PEA (tProbe Units), XUT or XUE (Dual PCIe Express) depending upon the hardware.
| Item No. | Item Description |
|---|---|
| SA026 | Adobe Audition Software |
| Related Software | |
| XX019 | Transmit/Receive File Utility Software |
| XX020 | Record/Playback File Software |
| XX051 | Synchronous Trunk Record Playback |
| XX031 | Enhanced T1 / E1 Call Capture/Analysis Software |
| SA021 | File Edit Software |
| STE40 | Mux-Demux Software |
 Back to Miscellaneous Software Index Page